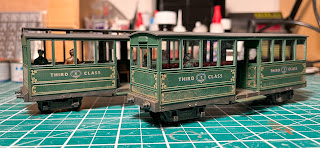
Corris Completed
I’m not one for New Year’s resolutions, but the turning over of the calendar has seen a resurgence of my modelling mojo with a greater desire to get on with my modelling. It’s also helped that the nasty cough fuelled lurgy that I caught at the beginning of December has finally cleared off. This has also increased my energy levels which helps.
It’s fair to say that I got bogged down with the Corris carriages in the autumn. Glazing is my least favourite task with rolling stock and these are a pair of greenhouses on wheels! I keep saying that I’m done with building carriages for a while and then promptly build some more. So if you hear of me thinking about building some more then please remind me of this.
The knock on effect to this has been no progress on ‘Wheal Ponder’ since the late summer. Which means that I’ve decided to pull the layout from Mickleover in a fortnight and concentrate on showing ‘Elsbridge’. Hopefully that will mean more chances to eat cake and talk to people too.
With a fresh desire to get on with my modelling, I’ve cracked on with the Corris carriages and they’re now completed and I’m rather pleased with how they’ve turned out.
To recap slightly, once I’d finished the main build stage on these kits from Iconic Rail, they were cleaned and then primed using a Halfords rattle can of red oxide. Deciding to paint them a different colour to the usual brown, they were then sprayed with Railmatch BR Southern Region Green. A pleasing mid green shade which would also allow the blue shaded lettering and the lining to be seen. Boyd stated that some carriages were green on the Corris at one point. Though with no evidence to back up the claim it’s difficult to judge whether that is fact or fiction.
Once hardened, I applied the water slide lining and lettering transfers as per the instructions given to me by Mr Iconic Rail, Graham himself. Namely to cut out the lining and lettering as a complete panel, rather than trying to cut out each side of the lining and apply the lettering separately. This advice worked a treat and before long, both carriages were fully lined and lettered. A couple of days in the airing cupboard ensured that they were completely dry before the carriages were given a waft of Dulcote varnish to seal everything in.
This coincided with Christmas which gave them a good fortnight for everything to harden off and then it was on to glazing, my least favourite part of carriage modelling and also the most obvious part of two mobile greenhouses such as these.
In the packet was a sheet of glazing material that was cut for the ends of the compartments. There was a sheet of very thin blue tinged clear material for the clerestory roof which I’m sad to say I couldn’t get on with so mine remains unglazed. Noticeable very close up, the absence goes unnoticed at arms length. Have to admit that I had to hand an unbuilt example of these kits, the flat pack ends and sides making it far easier to access the inside glazing recesses for measuring and trial fitting rather than the inside of a built carriage.
This left the side windows on the saloons and the vestibule- seventeen per carriage for which, seventeen individually cut pieces of glazing material are provided. Mine didn’t quite fit, I suspect due to the paint that I’d applied. Maybe I was a little too thick with the paint for the fine tolerances required. Trimming each piece to fit was a tedious affair, but far easier than cutting each piece out myself so every cloud and all that. All the glazing was fitted using ‘canopy glue’ that dries clear and applied sparingly with a cocktail stick.
Whilst painting the carriage, I also painted some people to sit inside as I found the lack of passengers looked a little odd with such large windows. These were fixed in place along with the roofs and a small amount of weathering saw them completed.
Whilst it’s been a longer and more drawn out process than I intended, I’m really pleased with how these have come out. I enjoyed the process of building the kits, the materials used are very much in my comfort zone and the transfers provided adds the finishing touches that I just couldn’t replicate with a bow pen.
It must also be remembered that these are complete kits, including glazing and transfers in addition to wheels. Glue, paint and couplings really are the only things needed to finish them off and all credit to Graham for these kits.
For now, they sit above my workbench alongside one of my Fletcher Jennings tank locos whilst I return to Wheal Ponder. One day I will add to the rake, I’d like a composite coach with some first class in it for a start and then Graham has said that he’s producing the four wheelers so I’ll need at least one of those I suppose…. But they can wait for a while!! Though once Wheal Ponder has some more scenery applied, I might finish off my Wrightlines Corris No 4 kit to haul them.


Comments
Post a Comment