Iconic Carriages Part Two
First step is to separate all the injection moulded body pieces from their sprues. Some of the pieces are quite delicate so this stage requires care, patience and a sharp scalpel. Once removed I cleaned up any flash before starting construction. On the clerestory version I test fitted the roof and found the ends and partitions needed a little extra cleaning to fit the roof casting.
One thing omitted from the instructions is handrails. This is easiest done on the flat, drilling holes before assembly. My carriages are for a freelance railway so I omitted the handrail along the side and only fitted handrails to the vestibule entrance. 0.45mm diameter brass wire was used. I forgot until after assembling the first one, hence why one of mine has straight handrails and only one has the fancy curved rails of the prototype as I couldn’t get the drill in. Writing this with hindsight, it’s best to drill the holes before assembly and bend your handrails to suit, but then leave the handrails off until you’ve fitted the seats.
Once fettled, the sides were assembled from a pair of pieces. I used ‘plastic weld’ applied with a paintbrush for the plastic to plastic joints with a cyano glue for other joints. The opening side was missing a rebate on one half of the top of the opening. This was simply added using a file in a couple of minutes. Once the sides had hardened, but I assembled the box like body. Whilst the instructions say to build this on the floor, I found it easiest to attach the partitions and ends to the door opening side, then add the floor and finally the second aide. Once the glue had set, I was left with two sturdy box like bodies.
At this stage, I concentrated on the Metropolitan carriage kit. Next the seats were added. These are resin castings and are supplied over length, requiring sanding / cutting to length. The whitemetal feet are supplied on a spruce making cleaning them up easier, plus there are spares, a nice touch I thought. Once fettled they were glued into the slight rebates on the seat castings and then the seat assemblies were fixed into the body.
Followed by cleaning up and affixing the buffers and buffer beams, these being whitemetal and again giving some useful weight.
Next up were the bogies. Each bogie is made up of three castings. Once cleaned up with some filing, I ran a drill through the bearing holes and the hole in the centre of the bolster. The bearings glued in and then the three castings glued together, trapping the wheels in place as I did. A screw is provided to secure each bogie, self tapping into the floor. I’m currently undecided as to whether to keep this method or to replace with bolts, washers and nuts.
One thing about the bogies is that they make the carriages ride at the higher height of the restored example on the Talyllyn. This suits my needs. For anyone wanting to reduce the height to the original Corris version, I’m sure that the bogies could be modified to reduce their height sufficiently with some ingenuity.
This ends the build as per the instructions save for painting, glazing and fitting the roof. However…. There are two glaring items which need attending to in my mind.
First are Truss Rods. These are on one of the last sketch diagram but no sign of them in the parts. Somewhere, I have some Queen posts and turnbuckles, but can’t currently find them. So an order to EDM for some more will have to take place before I can progress.
Secondly is the Footboard. There is a footboard shaped styrene in the packet but no mention in the instructions. I have some footboard brackets in my bits box which I will probably use. But I want to fit the truss rods before I do.
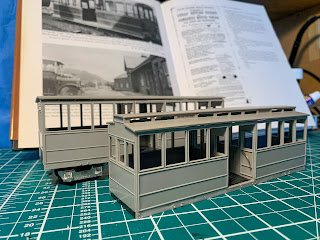
Here’s a photo of the Metropolitan carriage that has reached this stage. There will be a pause in posts whilst I bring the second one up to this stage. Then there’s just couplings to fit before painting and glazing. Plus I won’t get chance to sit at the workbench again until early next week.
My initial thoughts are that these are a great addition to the 7mm narrow gauge scene. There are a few minor niggles as mentioned above, but the positives far outweigh the negatives in my opinion. I’ve really enjoyed building them so far which ticks many boxes in my view. If I had the time and space, I’d have a layout where I could run trains of five or six of these. Then there’s talk of the four wheelers to follow, exciting times.


Comments
Post a Comment